Growing Your Indigo Seeds (Persicaria Tinctoria)
- Michelle Moore
- Jan 15, 2024
- 3 min read
Getting Started!

Growing Information:
You can choose to start your seeds indoors after the the threat of frost or you can direct sow in early Spring.
I often do a combination of both- Mostly because I am too excited to wait until early Spring to start growing.
If you choose to start your Indigo inside, just be sure to follow a few simple guidelines:
Indigo loves to sunlight and water. I usually get a nice seed starter soil and wet it out so that it is not soggy- but has good moisture in it. I will then fill my starter cells with the wetted out soil and poke holes where I will drop my seeds with a bamboo skewer.
Keep the seeds covered with direct light until they germinate. Water from below using a watering tray.
*TIP* Indigo loves Nitrogen so I save my leftover coffee grounds/ wrap in cheesecloth and soak overnight in plain water. I then use that water in the watering tray. You can also use bonemeal or other nitrogen rich fertilizers in the soil too.
Once the seeds have germinated let the grow until you are ready to transplant outdoors. Harden off before moving to their new home in the wild.
If you choose to direct sow:
You can start your seeds after the threat of frost has passed. I love to use a raised garden bed for this. Actually, I've been using a raised watering trough from Tractor Supply for years. It's a great way to keep my indigo separate and contained.
Make sure your bed is a sunny spot. Then fill your bed with nitrogen rich soil/fertilizer. . I also mix in a little vermiculite to the soil. Then, wet your soil and sprinkle your seeds on top. I then top off and cover the seeds with more of the vermiculite. Keep them watered daily. Once the seedlings emerge continue to make sure they are watered and fed!
Keep them watered. Water from below and not from above as much as possible to avoid scorching the leaves. Water in the evening after the the hottest part of the day and direct sun has passed.
Uses:
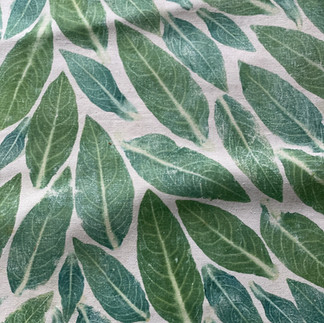
Unlike many dyers, I mainly grow Japanese Indigo for the fresh leaf dye. I really love the turquoise blues and ease of grabbing a few leaves for hammering, stenciling, and blending.
Of course, you can also save your leaves and use them for an extraction of pigment to harvest traditional pigment that would be used in a vat.

This photo shows a variety of methods; hammered fresh leaves, blending, and stenciling all achieved through fresh leaf processes

Image above: Japanese Indigo growing roots and ready to be planted for a second harvest
A cool fact about Japanese Indigo:
You can harvest all of the leaves and do it again! Once you pull all the leaves from the stalks you can place the stems in water for around 2 weeks and they will root! All you have to do is plant them again- and they will produce a second harvest for you. How cool is that?
My journey:
I find that the fresh leaf processes are a great starting point for exploration with this magical plant.
When I first started growing Japanese Indigo I wasn't really sure what to do with it. I knew that the idea of growing my own BLUE dye sounded dreamy...but where do I go from here? I had purchased dried Indigo pigment and had played with making vats for dyeing- But I didn't really understand how that translated. How do I go from plants to fabric? What was the extraction process? I had so many questions.
Eventually I figured out the fresh leaf processes and I was hooked. The idea that I could use the leaves to make a beautiful turquoise blue through so many unique processes, excited me!
SO, I dove in and started experimenting. I learned that you can hammer Japanese Indigo leaves for color, stencil, and blend/macerate the leaves for color. HOW COOL!
Have a question?
Leave it below!
Happy Gardening!
Xo,
Michelle


